

It snuck up on me, but now is that time of year when I need a homemade treat to give as gifts. This year, that treat will be chocolate bark. I can make it with ingredients I already have in my pantry, and I can make it in less than half an hour. And each batch can be personalized to match my gift recipients' tastes if I know them well... or my current mood if I don't.
You never have to measure to make chocolate bark, which makes it the easiest, prettiest gift you can make - no recipe required.
First things first: chocolate bark is mostly just melted and cooled chocolate, so you're going to need a lot of it. How much? Well, 12 ounces of melted chocolate makes a nice sized batch that can be divided into two or four gifts, depending on how much chocolate you want to give. But really you can use however much chocolate you have or want - just be ready to pull out another baking sheet in the event that you melt too much.
The quality of the chocolate is really going to be noticeable here, so use the best quality chocolate you can, and pick whichever style you like: white, dark, or milk. Chop it up if using block chocolate, or simply break it into pieces if using a thin bar.
Pick and Prep Your Mix-Ins
Before you proceed, decide on your mix-ins. I like to use at least two - but often more - mix-ins for each bark I make. (Peppermint bark purists, you can stick with just one.)
 |
Are you an extra-credit kind of person? If you, you'll also want to choose a flavoring element that will actually flavor the chocolate. Think orange zest, dried ground spices, salt, vanilla extract or even a little caramel sauce - as long as it will go nicely with your mix-ins, you're golden.
Melt That Chocolate
You can melt you chocolate in one of two ways: in the microwave, or on the stove in a double boiler or a heatproof bowl set over a pot of simmering water. I prefer the stovetop method because I like to see what's going on, but they both work.
If using the microwave, put your chopped chocolate into a microwave-proof bowl and zap it in 10 seconds intervals, stirring between each, until it's smooth. If using the stovetop method, just keep stirring and watching until it's nice and smooth, then pull it off the heat.
Stir in Some of the Mix-Ins
Some people would have you put all your mix-ins inside the melted chocolate, while others would have you put them only on top. The best way is to do both. Stir in some of your prepared mix-ins and flavorings until it's the texture you like - some people like a more densely populated bark, while others like to have plenty of room to breath around each chunk. Dip a spoon in and have a taste, and add more flavorings if desired. At this point you can melt more chocolate and mix it in if you accidentally went too crazy with the chile flakes or something.
Spread it All Out
Line a rimmed baking sheet with parchment and spread on the warm chocolate mixture in an even layer that's somewhere between 1/8 and 1/4-inch thick, working quickly so that your chocolate doesn't cool before you have a chance to top it. While it's still warm, sprinkle some more of your mix-in ingredients on top until it looks pretty.
Chill Out
Pop that tray into the freezer for five to ten minutes to harden. (Freezer full? Put it on a chilly porch or in a cold garage.) Once the chocolate is hard to the touch, it's ready.
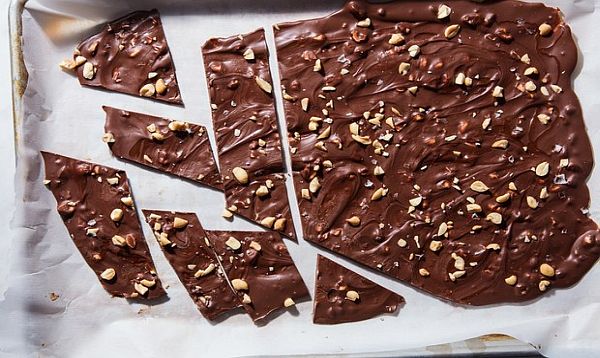
Snap It! Slice It!
While the bark is still very cold (it works better this way), break it into whimsical pieces. Or take a knife to it and slice it into more uniform shapes.
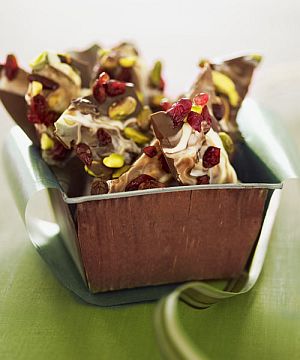
Give it All Away
Store your finished bark in the fridge (or back out on that chilly porch) in festive cookie tins or tightly sealed cellophane bags until you're ready to give them away. Your giftees will probably eat the chocolate bark right on the spot (hey, you made it for them, how can they resist?) - but if they don't, tell them to store it in the fridge to make it last.
Original article